When managing pipelines for large and complex repositories with multiple ‘Platforms’, each containing multiple apps and services, then the folder structure and variable strategy can be complicated. However, if this is done right, then the payoff for template reuse is dramatic.
Here, I outline my approach on the pipeline folder and YAML structure only. The variable structure allows for a full set of naming conventions to easily default across all your projects apps and delegate standards to organisation and platform levels. This, ideally, leaves only app specific configurations for your dev teams to manage and worry about.
This strategy rests on top of my general approach to structuring a mono-repository. For more details on that see Mono-repository folder structures.
Every developer has their own way of structuring their code base. There is no right or wrong way, but some strategies have at least had some logical thought 😉
This is a sample of how I generally structure my mono-repos when they need to scale to many organisational platforms, apps, and projects.
There is a lot written about paging strategies for REST API’s. This is my simple and quick take on the subject and what I generally implement when rolling my own APIs.
Any API that returns a collection should have some form of return result limiting. This is to avoid killing your web servers, database servers, networks and avoiding a super easy distributed denial of service (DDoS) attack.
I don’t cover other optimisations like filtering and sorting, although these do have a major impact too.
There are two major API standards/frameworks that I would follow when implementing my own paging strategy:
Adding to that, there are two primary pagination styles:
Offset
Most common. Set the number of records in a page and then the record offset to use.
If there are more results, the server also returns some metadata that contains information about the current page, such as the total number of pages and the link for the next page.
Keyset / Cursor based
Less common. Harder to program. Uses a specific cursor, which is a unique identifier for a specific item in the list, then returns this record and the next specified number of results.
If there are more results, the server also returns a cursor for the next page.
Standard / Framework
Primary Paging Method
Query Properties
OData
Offset
– skip (the offset from the beginning of the results) – top (the number of records it wants to retrieve in each page)
GraphQL
Keyset / Cursor based
– first (the number of records to return) – after (specify the cursor of the record to show after)
Table showing high-level paging methods
My General Principals
Use Offset paging unless, you have large data and performance challenges.
Use ‘skip’ and ‘top’ for the parameters, as this matches OData which you may want to implement later anyway.
Always have a default page size (‘top’) and use it if ‘top’ is not specified.
Always return a total query set count (integer) by default. e.g., $count defaults to true, but can be turned off, if necessary, by passing false.
If more records exist, then always return a ‘nextLink’ URL
Put the results array into the ‘value’ field to match that of the OData.
There are a few complexities that may be of a concern if you are requiring an exact immutable record set. In most cases, this is not critical, but could be in a financial or audit type scenario. That is the complete recordset will need to be locked and remain unaltered during all the paging activities.
An example would be where a field in the recordset must add up exactly to a total at a specific point in time.
As most dataset are dynamic, new records can be added and removed at any point and that means you can’t guarantee to not return the same record in different pages or that the records on a given page/offset will remain the same, and that the total count does not change.
There are several solutions to this problem, and I will only suggest the easiest here and it’s not perfect either. The dataset will require a created timestamp field, as well as a soft delete ‘isDeleted’ or ‘deletedAt’ type field. Then you can return all the records (including the soft deleted ones) prior to a specified creation time (i.e. the time of the first request in the sequence).
This would ensure consistency in the records returned, but not necessarily the values in those records.
Although you can print a single page of your wiki to a PDF using the browser, it’s problematic when you have a more complex structured multi-page wiki and you need to distribute or archive it as a single file.
Fortunately thanks to the great initiative by Max Melcher and his AzureDevOps.WikiPDFExport tool, combined with Richard Fennell’s WIKI PDF Export Tasks, we can not only produce pretty good multi-page PDF’s of our Wiki’s, but to also create a Pipeline to automate their production.
The documentation for both these tools is good, but I have included here some additional tips and more complete steps to quickly get your pipelines setup.
Pre-requirements
To follow the steps outlined below you will need to:
I create a local folder like C:\MyApps\AzureDevOps-Export-Wiki\ and drop the EXE there. Then I can execute all my command lines and see the outputs there too.
Assume we have an Azure DevOps (Azdo) project called ‘MyAzdoProject‘. This has a default code repository with the same name and once created, a wiki repository called ‘MyAzdoProject.wiki‘.
You can clone this Wiki repo by selecting the ‘Clone wiki’ from the Wiki menu.
In the code repository, I have created a folder called /resources/wiki-pdf-styles/ to hold the
Header HTML template file
Footer HTML template file
CSS Style Sheet
In the Wiki, we may have documentation for several Apps and each may have several sections such as Architecture, UX design, Requirements notes etc..
For this illustration I am only wanting to output the Architecture pages and subpages for App1. So everything below /App1/Architecture/** in the wiki.
The Resource Files
My resource files are as follows (name of the files include the apps ‘Short Code’ ‘app1’ so each app can have independent files):
body {
  font-family: "Segoe UI Emoji", Tahoma, Geneva, Verdana, sans-serif;
  font-size: 10pt;
}

h1 {
  font-size: 25pt;
  color: #521e59;
}

h2 {
  font-size: 20pt;
  color: #3b868d;
}

h3 {
  font-size: 15pt;
  color: #f39000;
}

h4 {
  font-size: 12pt;
  color: #ec644a;
}

img {
  max-width: 100%;
  max-height: 800px;
}

/* Workaround to add a cover page */
.toc {
  page-break-after: always;
}

/* target a span with class title inside an h1 */
h1 span.title {
  page-break-before: avoid !important;
  page-break-after: always;
  padding-top: 25%;
  text-align: center;
  font-size: 48px;
}

/* make tables have a grey border */
table {
  border-collapse: collapse;
  border: 1px solid #ccc;
}

/* make table cells have a grey border */
td,
th {
  border: 1px solid #ccc;
  padding: 5px;
}
The Command Line
You can manually run the azure-export-wiki.exe (download the latest from here Releases · MaxMelcher/AzureDevOps.WikiPDFExport (github.com)) locally on a clone of your wiki repository. This is useful not just to output the PDF, but also to quickly refine your customizations, such as, parameters, templates and CSS.
I have used the following parameters:
-p / –path
Path to the wiki folder. If not provided, the current folder of the executable is used.
-o / –output
The path to the export file including the filename, e.g. c:\output.pdf
–footer-template-path, –header-template-path
local path to the header and footer html files
–css
local path to the CSS file
–breakPage
Adds a page break for each wiki page/file
–pathToHeading
Adds a path to the heading of each page. This can be formatted in the CSS
–highight-code
Highlight code blocks using highligh.js
–globaltoc
This sets the title for a global Table of Contents. As you will see, I have used this, in combination with the CSS to add in a main header Title.
You can run and refine this command line locally and generate the output.
You can also do a lot more styling with the CSS than I have done and refine it to your requirements. Just use the –debug flag in the command line above and the intermediate HTML file is produced. You can then see all the classes that you can play with.
The Pipeline
I decided to create a YAML Pipeline Template, as I often have many apps and extensive wiki documentation. Printing the whole Wiki to a PDF is not feasible, and hits limitations, so I have a several pipelines to output distinct parts of the wiki structure.
The YAML Task Template (publish-wiki-to-pdf-cd-task-template.yml)
Everything in this template is parameterized to allow flexible usage. You can also set the defaults and simplify the consuming pipelines.
# Task template for generating the PDF from the Wiki

parameters:
  - name: LocalWikiCloneFolder
    displayName: The local path to clone the wiki repo to
    type: string
    default: '$(System.DefaultWorkingDirectory)\wikirepo'
  - name: WikiRootExportPath
    displayName: The path in the Wiki to export to PDF
    type: string
  - name: ProjectShortCode
    displayName: The short code for the project. Used to pick up the custom headers and footers files
    type: string
  - name: CustomFilesPath
    displayName: The local path to the custom files on the build agent in the main repo
    type: string
    default: '\resources\wiki-pdf-styles\**'
  - name: PdfOutputFileName
    displayName: The filename for the output pdf. Do not include the extension
    type: string
    default: '$(ProjectShortCode)-Wiki.pdf'
  - name: WikiRepoUrl
    displayName: The URL of the Wiki repo
    type: string
    default: 'https://myorg@dev.azure.com/myorg/MyAzdoProject/_git/MyAzdoProject.wiki'
  - name: PdfTitleHeading
    displayName: The title heading for the PDF
    type: string
    default: 'Nicholas Rogoff - $(ProjectShortCode) - Wiki'

steps:
- task: CopyFiles@2
  displayName: Copy-Headers-Footers-Styles
  inputs:
    Contents: '$(CustomFilesPath)'
    TargetFolder: '$(System.DefaultWorkingDirectory)\styles\'
    OverWrite: true
  enabled: false
- task: WikiPdfExportTask@3
  displayName: Create-PDF
  inputs:
    cloneRepo: true
    repo: '$(WikiRepoUrl)'
    useAgentToken: true
    localpath: '$(LocalWikiCloneFolder)'
    rootExportPath: '$(WikiRootExportPath)'
    outputFile: '$(System.DefaultWorkingDirectory)\$(PdfOutputFileName).pdf'
    ExtraParameters: '--footer-template-path "$(System.DefaultWorkingDirectory)\resources\wiki-pdf-styles\footer-$(ProjectShortCode).html" --header-template-path "$(System.DefaultWorkingDirectory)\resources\wiki-pdf-styles\header-$(ProjectShortCode).html" --css "$(System.DefaultWorkingDirectory)\resources\wiki-pdf-styles\styles.css" --breakPage --pathToHeading --highlight-code --globaltoc "<span class=''title''>$(PdfTitleHeading)</span>" -v'
- task: PublishBuildArtifacts@1
  displayName: Publish-Artifact
  inputs:
    PathtoPublish: '$(System.DefaultWorkingDirectory)\$(PdfOutputFileName).pdf'
    ArtifactName: 'drop'
    publishLocation: 'Container'
The main pipeline
# Publishes the wiki to PDFs

trigger:
- none
pr: none

# schedules:
# - cron: "0 0 * * *"
#   displayName: Daily midnight wiki publish
#   branches:
#     include:
#     - main

#   always: true

pool:
  vmImage: windows-latest

# Setting the build number to the date as work-around to include in the Title as $(Build.BuildNumber)
name: $(Date:yyyy-MM-dd)

variables:
- name: projectShortCode
  value: 'app1'
- name: localWikiCloneFolder
  value: '$(System.DefaultWorkingDirectory)\wikirepo'
- name: wikiRootExportPath
  value: '$(localWikiCloneFolder)\MyAzdoProject\Projects\CDH-UI\Architecture'
- name: customFilesPath
  value: '\resources\wiki-pdf-styles\**'
- name: wikiRepoUrl
  value: 'https://myorg@dev.azure.com/m/MyorgyAzdoProject/_git/MyAzdoProject.wiki'
- name: pdfOutputFilename
  value: '$(ProjectShortCode)-Architecture-Wiki.pdf'
- name: pdfTitleHeading
  value: 'Nicholas Rogoff - $(ProjectShortCode) - Architecture Wiki $(Build.BuildNumber)'

steps:
- template: './templates/publish-wiki-to-pdf-cd-task-template.yml'
  parameters:
    LocalWikiCloneFolder: $(localWikiCloneFolder)
    WikiRootExportPath: '$(wikiRootExportPath)'
    ProjectShortCode: '$(projectShortCode)'
    CustomFilesPath: '$(customFilesPath)'
    PdfOutputFileName: '$(pdfOutputFilename)'
    WikiRepoUrl: '$(wikiRepoUrl)'
    PdfTitleHeading: '$(pdfTitleHeading)'
I have left in some running options here. The default is completely manual, but I have added for reference, commented out, the format for a scheduled operation, as well as on every change (not recommended).
I have also used the ‘name:’ (which is referenced as $(Build.BuildNumber)), to create a date in a format I wanted for the Header page.
When this pipeline runs the PDF artifact can be downloaded. You can obviously add a new step to copy the file to any destination that suits your requirements.
Ever had a PowerShell session when you are far down the folder path, and the prompt is so long it gets hard to see what commands and response you have…like this…
If only you could change the prompt to be a lot shorter…well, you can easily \o/
The PowerShell prompt is determined by the built-in Prompt function. You can customize the prompt by creating your own Prompt function and saving it in your PowerShell profile.
This sounds complicated, but the Prompt function is not protected, so to change the prompt for the current session only, just execute the function code as shown below, or with your own custom version and voila!
To make your custom prompt more permanent you need to save this to your PowerShell Profile. This means saving the function to the Power_profile.ps1 file in the appropriate location. Depending on the scope there are several locations, but I’m staying simple and changing mine for just me on my machine! 😉
Locations for Current user, Current Host are:
Windows – $HOME\Documents\PowerShell\Microsoft.PowerShell_profile.ps1
Linux – ~/.config/powershell/Microsoft.Powershell_profile.ps1
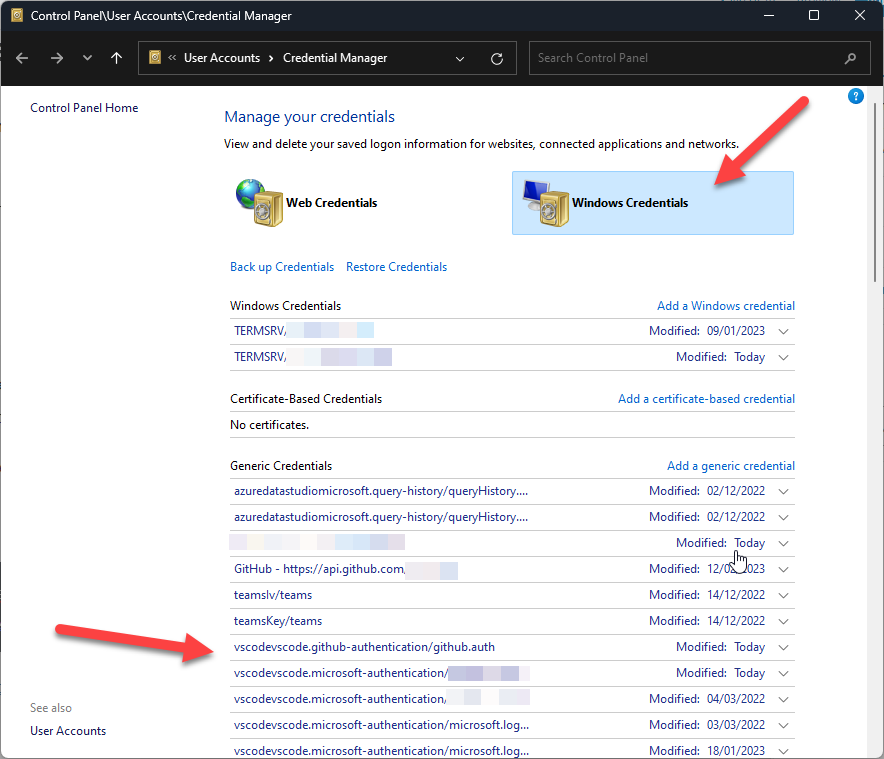
I have noticed that on one of my PC’s VS Code just would not remember my credentials when I started it up and I would have to re-login every time to get the sync to work.
I finally decided to try and fix it. It turns out that there are too many remembered credentials in the Windows Credential Manager
If you see a whole load of Windows credentials all starting with vscode then you may need to delete them, restart VS Code and re-enter you logins again. This time they should stick 😉
If you have a substantial number, then you can run the following command to remove all the VSCode credentials. This is what I needed to do. I had hundreds.