Category: Windows

Keeping your managed PC from locking all the time

I know you shouldn’t try and subvert your companies internal security policies, but sometimes the security department just don’t seem to understand the consequences of what they do…especially when using multiple computers simultaneously!

The following script essentially presses the inaccessible F15 key at regular time intervals to ensure the screen timeout is reset and you avoid locking out.

Continue reading “Keeping your managed PC from locking all the time”

Fix for OneDrive high CPU

If your OneDrive seems to be constantly running at a higher than expected CPU (anything above 10%), then this fix may help. It worked for me. CPU settled down after a while.

To see what’s eating your CPU, press CTRL+SHIFT+ESC. On the ‘Process’ tab sort the ‘CPU’ column to show the largest number at the top. If you see OneDrive up at the top most of the time, then it probably needs this reset. It should be pretty much on 0% once all is synced.

All your account settings and files will remain in tact. Make sure you have installed the latest version too ( https://onedrive.live.com/about/en-us/download/ ).

  1. Press the Windows key + R to open the Run Window.
  2. In the Run Window enter the following:
    %localappdata%\Microsoft\OneDrive\onedrive.exe /reset
  3. Click OK. The OneDrive system tray icon on the desktop should disappear and re-appear after a minute or two.
  4. If the OneDrive system tray icon does not re-appear after a few minutes, do the following. In the Run Window Enter:
    %localappdata%\Microsoft\OneDrive\onedrive.exe

Best app for analysing and visualising space usage on your hard drives. WinDirStat

I have been using this app for years and it’s still the best one out there.

WinDirStat (https://windirstat.info/) is a brilliant application that trawls through you files on a disk analysing their files types, location and size.


When it finishes analysing (which it does remarkably quickly, but may take a few minutes) you get presented with a great looking ‘TreeMap’. Select a folder or file type shown in the lists and the associated part of the map is highlighted. This gives you a very quick feel for what’s taking up all that space.


Making your My Documents folder sync with the New SkyDrive app

Microsoft have in their wisdom now decided to scrap Live Mesh (after scrapping Mesh and then Live Sync previously) and let hope settle on SkyDrive as the method for synchronising files and folders between devices.

You can get the new SkyDrive app from http://windows.microsoft.com/en-US/skydrive/download-skydrive

Unfortunately, this version of the application does not allow the synching of folders from any location. It will only synchronise data that is in a predefined location!

When you install SkyDrive you get a chance to select a location of the SkyDrive folder. If you choose the default it will create it in your profile folder. If you miss this, as I did, you need to do the following:

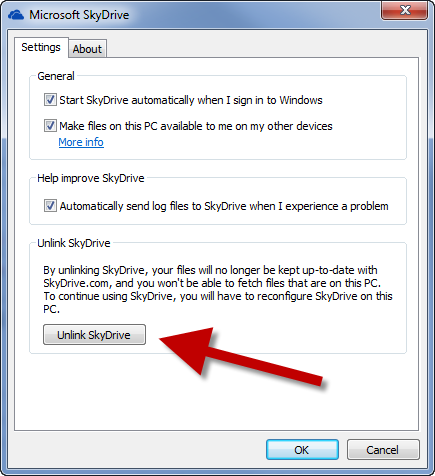
  1. Right-click on the SkyDrive otification icon in the bottom right and select Settings
  2. Then ‘Unlink’
  3. …and now re-link the SkyDrive and this time choose the preferred location for the folder.

Normally to get files and folders to sync you are expected to move them to this new folder. Frankly that’s just irritating, as you may have established a nice folder structure by now in you My Documents folder already.

So I decided to go the full hog and purchased 50GB of SkyDrive space for £16 per year and then proceeded with the following steps to move the entire My Documents folder to SkyDrive.

  1. Created a folder in the SkyDrive folder called Documents
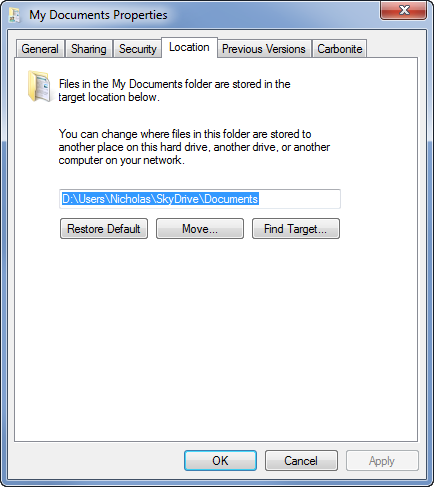
  2. Right-click on My Documents and select Properties
  3. Then select the ‘Location’ tab
  4. Click move and now select the new SkyDrive\Documents folder you just created.
  5. You will be prompted to move all your files. I suggest you select yes.
    (Watch out for folder and file path names that are too long. I had to move some stuff out of ‘My Documents’ for this to complete. Mainly because Visual Studio projects are deeply nested and can have huge names for files and folders.)
  6. When that completes you now have an actively synched ‘My Documents’ folder. You can follow this procedure for the other ‘My’ folders too, if you have space.

VC_RED.cab, VC_RED.MSI, install.res.1028.dll etc.. Can be removed!

If you are wondering how or what all these funny files (more listed below) are sitting on your c:\ or other drive, then you will be please to know that they were generated as temporary files by a Visual C++ redistributable install package. Unfortunately the package does not clean them up afterwards.

If they are not on your c:\ drive, that because the installer actually looks for the drive with the most available space or something like that!

Any of the following files can be safely removed.

install.exe
install.res.1028.dll
install.res.1031.dll
install.res.1033.dll
install.res.1036.dll
install.res.1040.dll
install.res.1041.dll
install.res.1042.dll
install.res.2052.dll
install.res.3082.dll
vcredist.bmp
globdata.ini
install.ini
eula.1028.txt
eula.1031.txt
eula.1033.txt
eula.1036.txt
eula.1040.txt
eula.1041.txt
eula.1042.txt
eula.2052.txt
eula.3082.txt
VC_RED.MSI
VC_RED.cab

For Microsoft’s article see http://support.microsoft.com/kb/950683

Delete and clear space taken up by Offline files in Windows 7

It took me a while to find this out, so to help others I have given the steps here. This will delete any locally cached off-line files from the mapping or computer that you set off-line files on.

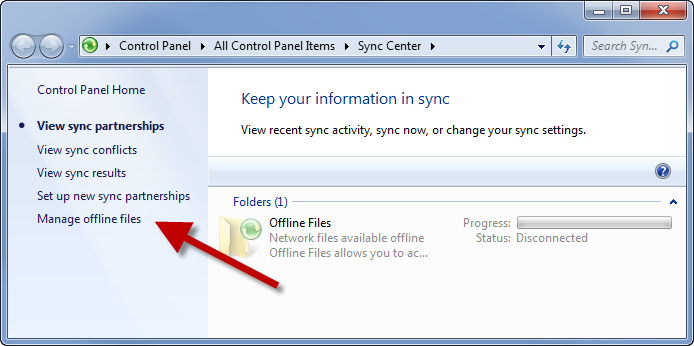
  1. Either open the ‘Sync Center’ and click on ‘Manage offline files’ or just type ‘offline’ in the start menu and select ‘Manage offline files’.
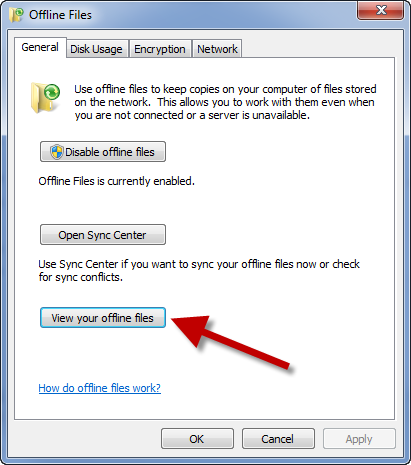
  2. Then in the ‘General’ tab of the ‘Offline Files’ window, click on ‘View your offline files’
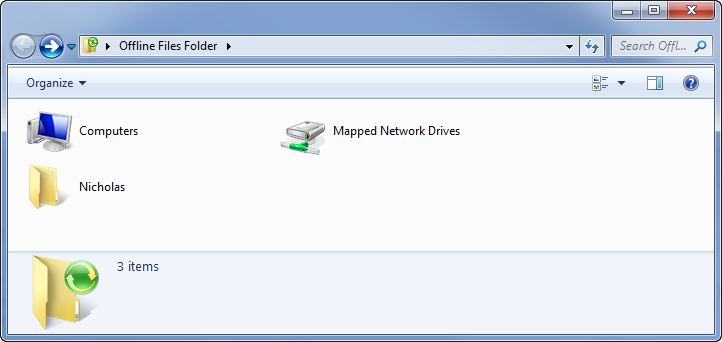
  3. You will now see an explorer window at the ‘Offline Files Folder’ level.
  4. Now you need to drill down to the specific mapped network drive or network computer you are caching local content from. In the next example I want to clear out a mapped drive, so I double-click on ‘Mapped Network Drives’
  5. You can see any mapped drives with off-line content. Right-click on the drive and select ‘Delete Offline Copy’